Friday, 29 July 2011

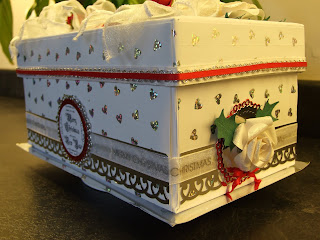
Tilda’s Christmas Gift Box


Good Evening Everyone, I wanted to show you my newest 2 Tilda’s, well it is new for me, I bought both in a sale and this is their first outing.  They are adorable!! I've coloured them with Pro markers. The full recipe for my card is below this post otherwise we could be here a long, long time. Lol


My recipe:
Well where shell I start.  This gift box started its life been a kids shoe box.
I covered the box in white paper all over and then covered it in Gift Rap
I used a Martha Stewart Lace Punch and created a lace effect border with Silver Mirror card
I glued a Merry Christmas Silver and White ribbon onto the Silver Lace Mirror card border
I decorated all the sides of this box with deferent embellishments. 
I printed a Digi Sentiment that I layered on top of Red and Silver mirror card that I cut out with 2 different Spellbinder Nestabilities and glued it to the front and the back of the box
On the Left and Right ends of the box I added another layered topper with Red and Silver mirror card that I cut out with 2 different Spellbinder Nestabilities and added a White Rose I made from paper and added a red Ribbon
I covered the inside of the box as well
I decorated the inside of the lid with a Magnolia Tilda stamp that I coloured in with Promarkers then layered it on top of Red and Silver mirror card that I cut out with 2 different Spellbinder Nestabilities I also added another white handmade rose and some small red roses and holly leaves I punched out with a holly leave punch and added a double red ribbon. I also used the Magnolia Vintage Tag I cut out of Silver Mirror card.

I made all these white roses with a punch and finished them all off with Stickles for a bit of Christmas Glitz!
Last and not least I decorated the top of the lid.  I added my toppers to a layered Mirror card and wrapping paper that I punched the corners with a Martha Stewart Corner Punch.  Again with white handmade roses I made and green holly leaves and added small red roses.  I made 2 bows with white wired Organza ribbon and added a medium single rose in the middle of the bows.  I Stamped another Magnolia Tilda stamp and coloured her in with Promarkers. I Layered coloured Tilda on top of Red and Silver mirror card that I cut out with 2 different Spellbinder Nestabilities. 
I added white ribbon, added silver cored and finishes of with very thin red ribbon and glued it as a trim to the lid.
All your comments are highly appreciated and I am always open for more ideas and advise!!

Happy crafting and Blogging!!!

 Thanks for stopping by!!
Until the next time!!
Lots of Love and Kisses


I would like to ender the following Challenges:
Crafty Cats = Christmas in July
Digi Doodle Shop - Anything goes

Fussy & Fancy - Christmas in July
Totally Papercrafts: Bling it up
Sew many Challenges - Anything Goes
2 Sisters = Anything Goes
Allsorts = Free and Easy
Creative Inspirations = Christmas in July
Pollycraft Monday = Christmas in July
Craft your Passion = Christmas in July
Cupcake Crafts = Shabby Sparkle
Top Tip Tuesday = Make it Girlie
Party Time Tuesday = Anything Goes
Creative Craft World = Anything but a birthdays
The Paper Shelter = Anything Goes
Crafts & Me = Ribbon
I love Promarkers = Anything Goes
Crafty Creations = Christmas in July
Craft us Crazy = Anything Goes

Wednesday, 13 July 2011

Greetings from the Lady


Greetings from the Lady

My recipe:
I used the Fetch a Sketch challenge
The main card is an A5 Dark Green cards stock
I used a vintage topper   
I gathered lace all around the image
Used green and cream gingham ribbon and layered my image it
I made a flower posy with roses and daisies and added a bow.

All your comments are highly appreciated and I am always open for more ideas and advise!!


 Thanks for stopping by!!


Challenge List:
Fetch a Sketch = Sketch
The Emerald Faerie Garden – Sugar and Spice all things nice
Cute Card Thursday = Lace
Moving along with time = Christmas in July
Craf Us Cracy = X-mas in July and Vintage
Paper Crafting Journey = For him
Crafty Catz = Vintage Look
Crafty Pad = Lots of Texture
Cards for men = Wild Wild West
Magical Monday = Use Texture

Birthday Wishes from a Fairy


Birthday Wishes from a Fairy

My recipe:
I used the Sketch Saturday sketch challenge
The main card is an 8x8 from White Hammered card stock
My image is a Digi from Wags and Whisker's and I coloured her in with Promarkers
Glittered her wings, belt and shoes    
I used the cricut to cut out the scalloped edge around my image and then cut another layer with turquoise card and layered my image on it
Added a silk ribbon to the side of my image and also to 2 going down my main card
I to paper lace and layered it on card stock
I distressed around my image and around my main card
I used a      punch to punch out 6 butterflies, 3 in white and 3 in Turquoise
I stigles the white ones and glued them to the turquoise and used some of the scraps to form the body in the centre
I added a sentiment
I added 3 brads to r-hand bottom and glued 3 pearls for the centre of the flowers.

All your comments are highly appreciated and I am always open for more ideas and advise!!

Happy crafting and Blogging!!!

 Thanks for stopping by!!
Until the next time!!
Lots of Love and Kisses!!
Denise xox


Challenge List:
Sketch Saturday = Sketch
The Emerald Faerie Garden – Sugar and Spice all things nice
Cute Card Thursday = Lace
Aud Sentiments – Sentiments with 2 word
Bunny Zoe =Fairies
Stamp something = Bugs or Butteflies
Stampin' for the weekend = Things with wings
Wags and Whiskers – Birthday
2 Sisters = Birthdays
Crafty Pad = Lots of Texture
Magical Monday = Use Texture

Love is the Flower of Love


Love is the Flower of Love

My recipe:
I used the Pink Ink sketch challenge
The main card is an 8X8 again in Pearl Blue cards stock
I used 3 different colours card stock for layering. I love the glitter dotted card and again some more glitter all in shades of Turquoises and a dark plain Turquoise   
I cut the edges with corner punch
Used a MJM Digi stamp and coloured it in with Promarkers and layered it
I added 3 felt flowers at the bottom left hand and added 3 buttons on the r-hand top corner.

All your comments are highly appreciated and I am always open for more ideas and advise!!

Happy crafting and Blogging!!!

 Thanks for stopping by!!
Until the next time!!
Lots of Love and Kisses!!
Denise xox


Challenge List:
Pink Ink = Sketch
The Emerald Faerie Garden – Sugar and Spice all things nice
Charisma Cards = All about Flowers
Phindy’s Place = Buttons
Hazelnuts Christmas = Spots
Sweet Stamping = Cute and Cudly
2 Sisters = Summer
The Crafty Pad = Lots of Texture
Karen Doodles = Summer Fun
Paper Playtime = Summer

Wednesday, 6 July 2011

Two Friends strolling on the Beach


Two Friends strolling on the Beach

My recipe:
I used the Stamp Fairy sketch challenge
The main card is an A5 white card stock
Use 3 different colours Red Yellow and Orange card stock
I used my Cricut Machine to cut the circles and the scalloped circle
Used a rubber stamp and coloured it in with Promarkers and layered it
I used 2 different ribbons and layered them
Lastly I added a bow with the two ribbons

All your comments are highly appreciated and I am always open for more ideas and advise!!

Happy crafting and Blogging!!!

 Thanks for stopping by!!
Until the next time!!
Lots of Love and Kisses!!
Denise xox


Challenge List:
Stamp Fairy = Sketch
Stamping for the Weekend = My favourite things = Promarkers and ribbons
Dream Valley = Ribbons
Crafty Catz = Colours of summer
Allsorts = Free and Easy
Craft Your Passion = Anything Goes
Crafty Anne = Get Well / Thinking of you
Papertake Weekly = Anything Goes
Shopping our Stash = My ribbons is from my scraps
Southern Girls Challenge = Inner Child
Secret Crafter = Here comes summer

The Sailer Boy


The Sailor Boy

My recipe:
The main card is an 6x6 and from a dark blue card stock
Use 3 different colours Red Blue and White card stock
I punched 4 small white stars and 1 big blue star with my punches and glued 1 small white star in the middle of the big blue star and the other 3 glued them in a row down the left corner
Used a digital stamp and coloured it in with Promarkers and layered it
I used 2 different ribbons and layered them
Lastly I added a sentiment

All your comments are highly appreciated and I am always open for more ideas and advise!!

Happy crafting and Blogging!!!

 Thanks for stopping by!!
Until the next time!!
Lots of Love and Kisses!!
Denise xox


Challenge List:
Moving along with time = here comes summer
Do You Stack Up = Squares
Delightful Sketches = Red, White and Blue
Stamping for the Weekend = My favourite things (promarkers and ribbons)
Crafty Catz = Colours of summer
Cardmaking Mamas = Red, White and Blue
Stamp Something = Use a Digi
Allsorts = Free and Easy
Secret Crafter = Here comes summer
The Pink Elephant = Red, Blue and White
Here Comes the boys = Must be male Spots and Stripes
Creative Inspiration = Red, White and Blue

Tuesday, 5 July 2011

With Love


With Love

My recipe:
I had a lot of fun with this card.  I do like Vintage and Sepia and Pink Colours and make things look old and distressed
I made this an 8x8 to fit this lovely topper from my stash
I distressed all of the topper edges with my scissors rubbing it up and down and rubbed distressed ink on the edges
I tore the edge of the main card and tore another 3 strips and distressed the edges
I wrapped around the 3 strips apiece of ribbon and lace and added a single flower with twisted stem
I arranged flowers and added a bow to the top left
All your comments are highly appreciated and I am always open for more ideas and advise!!

Happy crafting and Blogging!!!

 Thanks for stopping by!!
Until the next time!!
Lots of Love and Kisses!!
Denise xox

Challenge List:
The Paper Shelter = Anything Goes
ABC = Ribbons
Charisma Cardz = Ice Cream Colours Lovely Chocolate and Vanilla
Craft your days away = Vintage
Little Claire’s = Pink and Brown
Dream Valley = Ribbons
Addicted to Stamps = Wedding