Well The weather is FAB today! Hope you all had a great weekend up to now! Well I had 2 of my Granddaughters for Friday evening and then the other 1 stayed for the rest of the weekend and did we had fun! We were crafting making jewelry and painted nails. Just all the nice girly things!
Across at Hobbycutz we have a lovely new
Create Your Own Background!
We have a fantastic sponsor for this fortnight!

Well here is my take on this lovely digital Image from
Crafts and Me
Well I had real fun to create this 1!
I used White Card stock as my base
and created my folds and cuts
I took my lazer cut images and my stamped images, measured them
and calculated my my folds and cuts
I really wanted depth with this card
Close Up
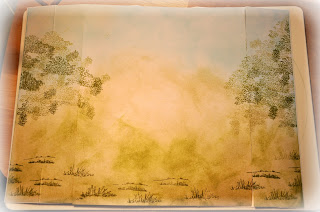
I took a Sheet of very good quality paper and
started to use my distress inks
to create my main back ground
Tim Holtz Distress Inks:
Old Paper, Peeled Paint and Broken China
I used a lovely little stamp set to create my background
Stamped randomly with 3 different coloured distress inks the leaves
and the grass bits at the bottom
Then measured and cut the back ground into 3 pieces
Glued to the main card and scored,
made the valley and mountain folds and cut were needed
I used "Fairy Tails" from Crafts and Me
She is so lovely!
After I coloured her in I cut and shaped my image to create dimention
I used lumps of SILICON to glue her down and in the front
at her feet directly onto the paper and took
the grass stamp and stamped grass over the glued area
to give the elision of the Image is part of the back ground
Promarkers used:
Vanilla, Ivory, Blush, Sunkissed Pink,
Mango, Bright Orange, Moss, Pear Green,
Cocoa and Tan
I added these fab Lazer Cuts from Hobbycutz
to create a tree or bush behind the Image
Stamped all the tree stumps and masked some to create a bigger tree
Stamped the lovely flowers and again masked and made bigger flower bushes
Cut the stamped image out and used again lumps of silicon for dimension
This lovely Window is another FAB lazer cut and the fairy too
I added on top of the Tree trunk to create a base for my window
Above the window I added this lovely Bird on a Swirl, but glued it only on l-side
so that it could hang over the folded edge
Promarkers Used
Tree Trunks:
Burnt Sienna, Caramel, Tan and Vanilla
Flowers:
Pear Green, Olive Green, Moss, Marsh Green
Lipstick Red Berry Red, Canary,
Mango & Bright Orange
I love the mushroom post box and
the little mouse trying to post his letter!
After I coloured my images in I cut and shaped it and used lumps
of siklicon hanging over the 2 folds
Promarkers Used
Mushroom:
Poppy, Lipstick Red, Cocoa, Tan
and Vanilla
Greenery and Ladybug:
Moss, Pear Green and Berry Red
Mouse:
Sandstone, Vanilla, Sunkissed Pink,
Denim blue, Aegean, Powder Blue
and Berry Red
I added another Bird with The Swirl to the r-hand side of this fold
And a few more Birds and Lazer cut Leaves
Well here is a photo taken from the side
and the completed project
Well I hope you enjoyed this project of mine and hope I could be of some inspiration to you!
Thank you again for taking the time out of your busy lives to visit my blog!
I would love comments and
why not become a follower if you are not one yet!
I would love that
xoxox

I am entering into the following challenges:
Creative Craft Challenges #17 (31) 7/9
Deep Ocean Challenge #58 (57) 25/8
Love to Create #79 (27) 26/8
The Paper Nest Dolls Challenge #11 (17) 30/8
Challenges 4 Everybody #27 (250) 30/8
Come and Get It Challenges Things with Wings (80) 25/8
Colour Me Creative Challenge #75 (91) 30/8


Fabulous, Denise! An amazing creation with so much detail!
ReplyDeleteChris
x
This is just gorgeous- and I love that you show visuals for the process!!! WOW!!!
ReplyDeleteWow!!!! This is creation is amazing!!! Lots of gorgeous details and fantastic bunch of laser cuts. Love it!!
ReplyDeleteHugs,
Natali
STUNNING. I love everything about this card. Thanks so much for sharing with us at The Paper Nest Dolls.
ReplyDeleteAdorable creation Denise!
ReplyDeleteThank you for joining our Shaped cards Challenge at The Paper Nest Dolls.
Jasmina DT PND
WOW! Such an amazing card ... love how you created the background for your scene! Amazing work!
ReplyDeleteThank you for joining us this week at Love to Create Challenge Blog.
Ruza, LTC Designer
Wow stunning card, fab scene and shape, thanks for sharing with us at Deep Ocean, hugs Liz xx
ReplyDeleteGorgeous card. Thanks for joining in our "Not A Square" challenge at Creative Craft.
ReplyDeleteHugs
Bev x
Super.
ReplyDeleteThanks for sharing at Love to Create this week.
Susan x
AWWWW truly so sweet! Love it! Thank you for sharing with us over at love to create challenges.
ReplyDeleteAmanda LTCDT
WOW! This is incredible and thanks for the tutorial bit:) Thanks for playing with us at Paper Nest Dolls:)
ReplyDelete